Sunday, June 16, 2019

My Journey to Becoming a Scrap Quilter Part II

Just to recap, I am trying to reorganize my stash to make it usable. I used to look at it and think "nothing goes together". Not anymore....boy was I wrong! To start from the beginning of my story, read Part 1 of this story first!

So after I organized my fabrics, which I talked about in Part 1, I thought about what color I wanted to use in my first quilt. I don't use red and pink very often so I had A LOT of those colors. I decided to jump into very uncomfortable waters with this quilt. I read in the book "Oh, Scrap!" that it is okay to throw in a bunch of variations of the same color and neighboring colors on the color wheel. So here is my quilt:

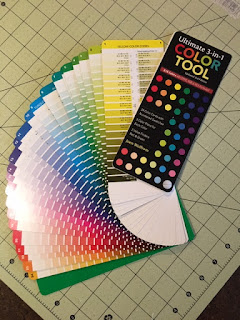
Here is my color wheel and how I used it: I stuck to the colors on the theses "pages", which are red, red-blue, Magenta, blue and chartreuse.  You need to use a variety of shades, meaning lots of lights, mediums and darks. You can't mix together colors that have grey and no grey!! That is one of the main keys to success. None of my colors have grey in them. Once I took out any grey toned colors, all of a sudden my stash looked like it matched. The "Ultimate 3 in 1 Color Tool" makes it easy to sort your fabrics into "grey toned" and "no grey".

So let's look at the next quilt I made. I decided I wanted to make a quilt with just blues. Well, blues and lots of low volume background fabric. I stuck with "true" blues, not ones tinted with red or green. I matched up each of my fabric choices to the card to make sure I was picking a cohesive group of blues. The blues I picked were on the "blue" and "cerulean blue" cards. The lighter blues I picked were on the turquoise blue card. I didn't really have lights on the other cards, and it looks fine. 


 I was able to include all sorts of low volume fabrics in this quilt. My favorites were ones with bits of blue and green in them, but I included most colors. It worked out well because the blues were strong enough to share the quilt with other smaller bits of color, meaning they were never over powered by the other colors. Blue is overwhelmingly the main focus of the quilt, which is what I wanted. You can purchase the pattern to this quilt here, in my Etsy Shop. It comes with directions for five sizes, so hopefully you can make several over the years!

Here is the last quilt I made. I love purples, so I wanted that to be the focus of this quilt. I didn't have a bunch of purples on hand, so I bought about eight fat quarters on the internet to make sure I had a good selection. In this quilt I used magenta, fuchsia, purple and red-violet. On the back of the color card it shows colors that play nice with the focus color. One of those colors is green, so I chose a few greens from the chartreuse card to complement the purples.


The pattern for this quilt is in my Etsy Shop. I wrote this one in five sizes as well. I always like to try to write the pattern for multiple sizes to make it more useful! The blocks are fairly small. They finish at 7 1/2". I have made several Churn Dash quilt patterns but this one sets itself apart because the actual churn dash is quite small. You can use 2 1/2" strips to make them! They can also be made with layer cake squares if you want. This is a forgiving pattern because none of the seams have to matchi up, it makes things easier!

Thursday, May 9, 2019

Journey to Becoming a "Scrap" Quilter Part I

Really I have no intention of becoming a true scrap quilter, but I do have a burning desire to use up some of the wonderful fabric that is left over from my projects. I am a quilter that uses precuts. I also design patterns for precuts (Sweet Jane's). I have no art background and as far as I can tell, no natural propensity for understanding color either. (Insert weepy sad face).  Up until now, I have saved my layer cake or jelly rolls strips and keep them grouped together in the line for a year or two, then I either give them away or throw them away😮. I know, right? I can't believe it either. Mostly my stash contains left overs from background fabric, backings and bindings and unused fat quarters from fat quarter bundles. I have two separate "stashes", this one is my modern brights, or "happy" fabrics.

I actually rearranged my fabrics after the above picture. I bought small bins that can be moved easily and basically put one color in each bin. I bought the bins at Target for about $2.00 each. Buy extra, because you will need more than you think and you will need more in the future!

But honestly, I don't like a lot of clutter and I am terrified of accruing so much fabric that it becomes overwhelming and out dated and just a monkey on my back. I have made two "scrap" quilts in the last two months and I can tell you my stash doesn't look much smaller. And I only have a small stash! So I have learned that even if you are determined to sew your own stash so you can use what you have, you are going to have to make A LOT of quilts. My interest in "scrap" quilting actually started because I hang out with about six ladies in their eighties and they all have a lot of fabric and it really upsets them. One lady put it well: "You know the joke about the one who dies with the most wins? Well it's not really that funny." Then, I see all of the amazing quilts people are making with fabrics from their stash, and they seem so amazing, that I want in. But...ugh...can I do it? I have always used precuts! I have very little color confidence 😰.

I took the first step and bought a color wheel. It has some good educational material in there about color, suggestions of how to put colors together and red and green tinted sheets to help determine the value of your fabrics (light, medium and dark). I sell it in my Etsy Shop and you can get free shipping if you purchase a pattern with the color tool:)

Look at all of the fabric you own. There are obvious things you will include in your stash, like left over border, binding and backing fabrics, but you are also going to want to think about partially used fat quarter bundles that you may be keeping separate. Sometimes it's hard to use them once all of your favorite fabrics have been used, so it's okay to include them in your stash. I also split up full fat quarter bundles that I knew I would never use. It was scary but very gratifying cutting open those bundles and giving these fabrics a new lease on life! I also had bundles of blenders  and solids that added a lot of variation to my stash. You can even consider opening up kits you may never make and add them to your stash. Just a few exception of fabrics I did not include in my color coordinated bins are: busy prints/florals, 1930's if you have a lot of them, holiday fabrics and Batiks.

You want to separate your fabrics into two general groups, and keep them separate! Using your color tool, figure out what fabrics have a grey tone and which do not. Using the Ultimate 3-in-1 Color Tool makes it easy, so don't worry!  My non-grey fabrics are my favorites, so that is what I am sorting and making quilts with.

Then I sat down with my stash and gathered one color at a time. I started matching them to the color swatches in my "color tool" and basically learned all about the nuances of color through this process. As an example, I took out the reds & pinks and sorted them from orange-red to fuscia. Basically as the reds got closer to blue on the color wheel, they changed from red and basically got a purple hue to them.


What I love most about quilts these days is the use of low volume background fabrics. I was feeling sorry for myself because I thought I didn't have a nice variety. OMG, look what I found when I emptied the small bin I keep them in!
Such a beautiful surprise! This just shows me once again that although I might have a fraction of what most quilters have, it is still plenty! I recently got the books "Oh, Scrap!" by Lissa Alexander and "Scrap-Basket Bounty" by Kim Brackett. I would HIGHLY recommend these books. They talk about being "scrap ready", meaning to have strips already cut, so when you want to tackle a project some (half?) of the cutting is already done. Otherwise it would be too overwhelming. Which is actually how I have always felt and it turned me off from scrap quilting. Bonnie Hunter has a great system of how she cuts her fabric for future projects. Her blog is a must read for those wanting to organize their stash in this manner. So what I did with maybe 1/3 of my background fabrics was I pressed them and cut them in 1 1/2", 2". 2 1/2" strips, and 2 1/2" & 5" squares. Here are the results:
Basically I cut up the fabrics that were on the small side (I did the same with my colored fabrics). I also took some fabric from large pieces and cut a variety of widths. You want to leave some fat quarters and bigger pieces uncut so you have plenty of options when you start a project. I also had at least 20 unused jelly roll strips from various lines that I was able to put in this pile. As of now I have no plans for a specific project, but I don't think it will be too hard to figure something out.

Stay tuned for PART II of my "Journey to Becoming a Scrap Quilter" series.